The DDH Leech
Fly tiers through the ages have come up with some truly amazing patterns that catch fish Consistently such as the Mickey Finn, Muddler Minnow, Humpy, Adams, Dahlberg’s Diver, Lefty’s Deceiver, Clouser’s Minnow, and a Woolly Bugger. Who hasn’t heard of these flies, and why? Simple all these flies work and not only for one species of fish but for a variety of fish.
In my own tying I have tied every one of these flies and a lot of other well known patterns and have used them with success. Being a multi species fly fisherman, I always try to find that one pattern that will effectively catch anything and everything. There are times I sit at my tying desk trying to come up with a fly that will do this and most of the time what I come up with works for some species but not others.
Then one winter night at the beginning of 1995 I sat down to tie a new leech pattern for Walleye. I knew I wanted a bit of weight up front to make the fly swim in an up and down motion but not sink like a rock, I decided some gold bead chain would be perfect and tied them on top of the hook near the front. Then, I took my favourite tying material, marabou and tied it in for a tail. I had two materials for my new fly but couldn’t figure out what to use for the rest of the fly. My eyes wandered around my tying room looking for something that I could use and I stopped at the dubbing. I thought if I put that material in a dubbing loop and wrapped it around the shank and over the eyes that it should look pretty good. I proceeded with the dubbing and examined the finished fly but there was just something about it that didn’t look right. I left the fly in the vice and got up to get a cup of coffee. On my way back I figured out what was wrong with it; the hair of the dubbing wasn’t long enough. I went through every packet of dubbing only to find the same result; all the hair was too short. I went to every store in the city looking for the correct dubbing and couldn’t find what I was looking for. Not one supplier of dubbing had the correct length.
Like any fly tier worth his weight in gold I improvised. I went to the local tackle store’s fly tying department to see if they had some rabbit skins hoping to find some longer hair. Perfect! I took the skins home and started cutting the hair from the skin, with a pair of scissors, time consuming to say the least but well worth it. I put all the hair into a large plastic bag to ready it for blending. I got my coffee grinder out along with some Static Guard and mixed a small amount of dubbing for the next couple of flies.
The length of hair improved the look of the fly by 200 % but as I was looking at it there was still a nagging feeling that something was missing. Then I thought of one of my fishing analogies that I relate to other anglers about fly selection, “When a person is in a room of brunettes you really don’t notice anyone until a blonde haired person walks in the room. Your eye is naturally attracted to that person because of the brighter color of hair”. So it is with fish, if they see a bit of flash on a fly it will get the fish’s attention. Fish are generally attracted to and curious about a little flash. As a result the fish will usually swim over to it and see if it is good to eat, greatly increasing your chances for a strike.
With so many flash materials on the market, I had to figure out what type of flash material would blend easily with the dubbing and be able to move in the water. There was only one type of flash enhancer I could think of and that was Diamond Dub Holographic. It was the right length out of the package and subtle enough to have movement in the water. I blended some dark brown Diamond Dub Holographic with the black rabbit and was really excited with the outcome. I tied up the first fly and I was pumped, so much so that I tied another 11 flies.
You may think I was crazy to tie a dozen flies that had never been tested but I had a good feeling about this one and believe it or not, there is a method to my madness. When the opening of the 1995 season rolled around I called 5 of my friends and told them that I had a new fly that I wanted them to try out. Each angler got two of the flies and the results of that June weekend blew my mind.
One of the guys went to a stocked Rainbow Trout lake and landed 67 trout over two days of fishing with the largest trout taping 30 inches. Another friend went for Smallmouth and he was ecstatic, in three days of fishing he landed 197 Bass. The third person went to the west side of Manitoba where the Rainbows and Browns average 22-25 inches and as related to me he caught a ton of fish all on the DDH. The other two guys went out for Pike and lost three of the flies on fish and brought the last one back with only the bead chain eyes and about four strands of marabou left on the fly. They landed 87 Pike in one day ranging in size from 27 to 39 inches. I couldn’t believe this fly caught so many fish! As for myself I had to wait until the following Tuesday to try the new leech pattern. I decided to fish the Bird River, on the east side of my home province of Manitoba, and left early enough to be on the water by 6:00 A.M. The water looked terrific as I raced to get into my waders and rig my rod. The cool thing about this spot is if you cast to the left shoreline you will catch Pike and if you cast to the right you catch Walleye. I hammered both species, 47 Walleye from 18 to 28 inches and 39 Pike from16 to 37 inches. What a debut from this fly!
Later in the week, while sitting on my patio, I got to thinking about this fly and the results from the previous weekend of fishing and wondered if this was some kind of fluke. There was only one way to find out, get some more DDH Leeches into other fly fisher’s hands. So, I tied another dozen and gave them to six more fly fishing friends to try them out. They all caught fish and not just bass, pike, and walleye, they caught those but a few more species were added as well,
Channel Cats, Carp, Freshwater Drum, Sauger, Walleye, and Goldeye. I was speechless! Never in a million years did I think one of my flies would catch that many and such a variety of fish this consistently.
Evidently, it wasn’t a fluke, so, to satisfy the fish, fisherman, and this fly tier I needed to tie it in different colors to continue the experiment. I tied them in, purple, pink, olive, and the original black and I sent them to friends across Canada, from B.C. to Prince Edward Island. The feedback was beautiful, Steelhead, Pacific Salmon, Cutthroat, Golden, Lake Trout, Brook Trout, were all caught on the various colors. In less than 10 years, virtually every species of fish that swims in Canada were caught on this fly.
In Fort Lauderdale, during a cruise with my wife, I showed this pattern to a couple of fly fishermen who work in the fly fishing department of the Bass Pro Shop. They gushed over the flies like a kid over chocolate. The first fly they picked up was the brown DDH, then the tan, and finally the olive. They both said they could nail saltwater species on these flies. I left the store about two dozen flies lighter and I’m really glad I did. Seems like the saltwater fish like them to. I have sent this fly to Australia, Belgium, France, Germany, England, Scotland, Ireland, Malaysia, New Zealand, Serbia, Slovainia, Italy, all across Canada and the U.S. and it has taken fish in each of these countries. As time goes on there have been 92 different species of fish in both fresh and salt water that have fallen prey to the seductive powers of the DDH Leech.
In saltwater this fly has taken Bonefish, Permit, Snook, Tarpon, Redfish, Greenling, and two types of Flounder. In freshwater, the list is quite extensive and includes, to name a few, Crappie, all types of panfish, all species of trout and char, Pike, Walleye, all species of Bass, Carp, Channel Cats, Freshwater Drum, Big Mouth Buffalo, Red Tail Catfish, Pacu, Barramundi, and the list goes on. The DDH Leech just flat out catches fish.
Tying the DDH Leech
Hook: (Freshwater) Daiichi 2151S or your favourite 2X nymph hook.
(Saltwater) Mustad 34007
Thread: Size “A” Rod Wrapping for tying the eyes on and 3/0 or equiv. For the tail and body.
Eyes: Bead chain sized for the fly and desired sink rate
Tail: Marabou
Body: Darkwater Dubbing
This is a very simple fly to tie but there are a few details spelled out below that will ensure the fly is as tantalizing and durable as possible starting with the hook.I used to tie this fly on a Mustad 3399 hook but have switched to a Daiichi 2151S horizontal loop eye hook. The Talon hook has a flat area towards the back taper of the loop which seats the bead chain eyes and makes them more secure. As well this hook is 2x stout and has never straightened out on me while fighting a big fish.
The first step of course is putting the hook in the vice. Start the rod wrapping thread at the hook eye and wrap back about two hook eye lengths or on the Talon, to the flat spot. Attach the bead chain eyes with three or four sets of figure 8 wraps and to make the eyes extra secure, I do 3 circular wraps between the bead chain eyes and the hook shank. These pinch the figure 8 wraps making it tighter and the eyes do not move at all. Tie off the rod wrapping thread and tie on 3/0 monocord for the rest of the fly.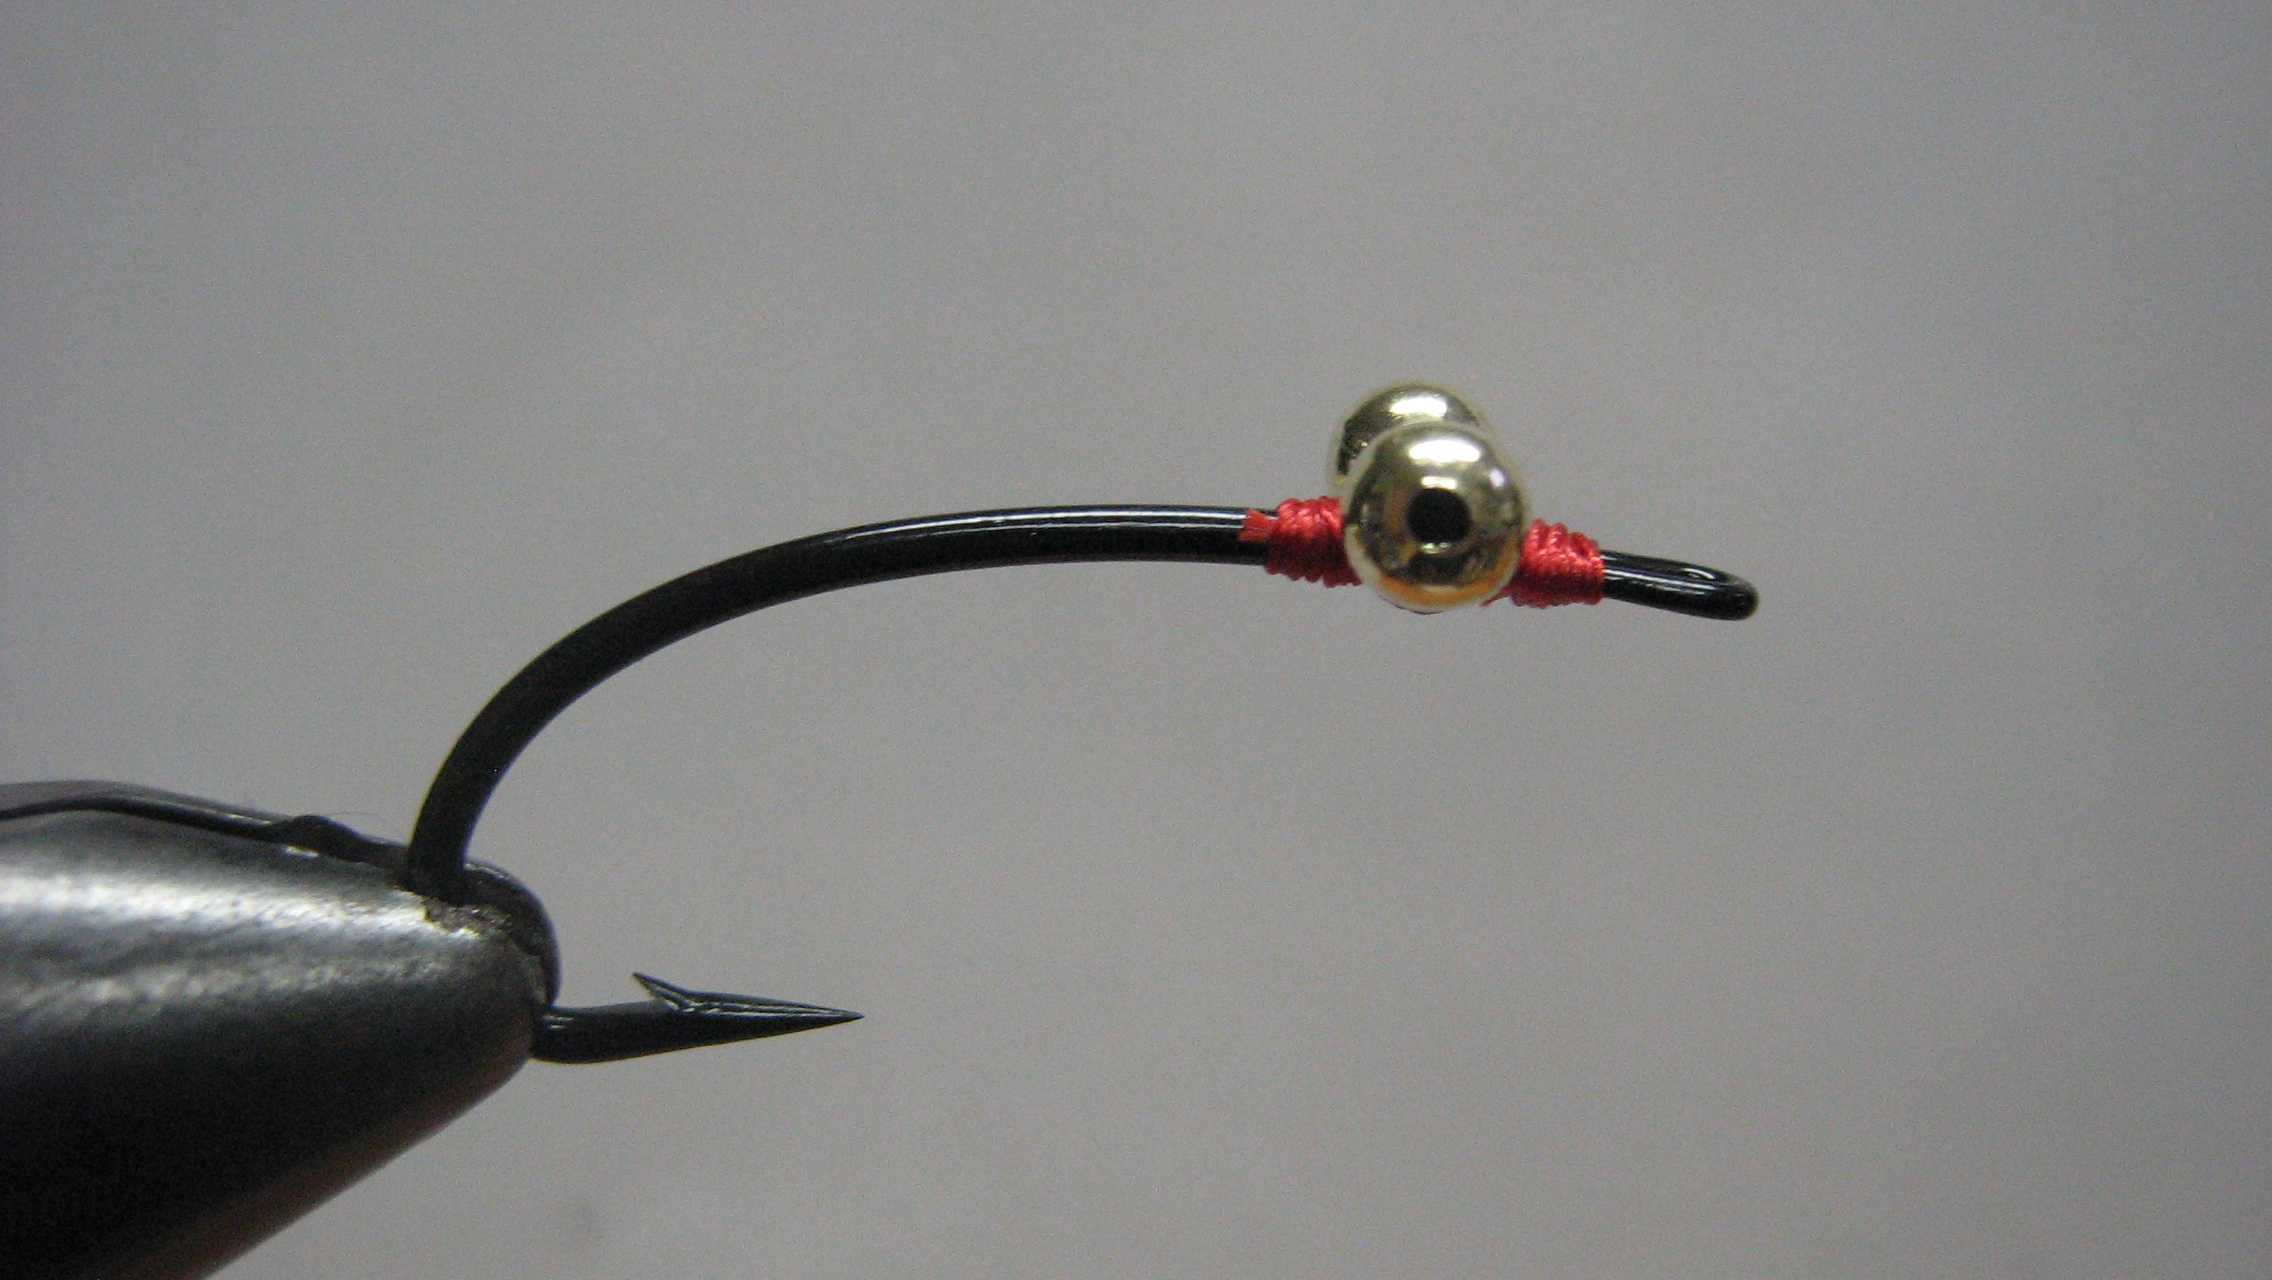
The next step is selecting the marabou for the tail. The feather has to be long enough to be tied in right behind the bead chain eyes and extend past the bend of the hook 1 to 1 ½ times the hook shank length. By tying the stem and fibers of the feather down the length of the shank behind the eyes is that it keeps the body diameter consistent and provides a secure foundation for wrapping the dubbing loop body. Tying in a clump of marabou at the bend of the hook will form a short hump and be susceptible to turning when you wrap the dubbing body and/or after a few fish eat it.

The length of the tail is paramount as well. If it’s too short there is no action but to long, you will get short strikes from the smaller species of fish. After measuring the marabou to the proper length, tie it in right behind the eyes and wrap the thread back towards the tail over the feather and hook shank until you are above the point of the barb, then wrap back towards the eyes securing all the loose marabou fibres. After this point wrap the thread ¼ of the way to the point of the hook. You are now ready for the next step, making a dubbing loop.

To form the dubbing loop, extend the thread so it is approximately 12 inches long and fold the thread in half, place the dubbing twister on the midpoint of the thread and hold while bringing the bobbin back up to the hook shank. Wrap the thread three turns around the hook shank to secure. Continue wrapping the thread back towards the tail at the same time capturing and tying down both legs of the loop until the thread is at the rear of the body above the point of the barb. At this point do a half hitch to anchor the dubbing loop and then take the thread back up to the hook eye and place a half hitch.
Get the dubbing blend and place small bunches at a time up against one another crosswise in between the two threads that form the loop until there is a line of dubbing filling the length of the loop. Take the dubbing twister and spin the loop tight.
After the dubbing loop is twisted tight, you have what is called a dubbing noodle or dubbing brush. With the twister still in place, hold the noodle taught and use a dubbing teaser such as Velcro glued to a clothes pin or a small battery brush and brush/tease out the loose fibres from the newly formed dubbing noodle. Twist the noodle 3 to 4 more times to ensure the tightness of the loop. (If you are not familiar with dubbing loops, go on-line and do a search on making a dubbing loop and you will find several uploads by tiers demonstrating this technique.)

When you make the first wrap of the noodle around the shank above the barb, remember to comb the fibres back with your fingers as you continue to wrap to the eyes. Once the eyes are reached the tier has to do a figure 8 wrap around the eyes and should have approximately 2 inches of the noodle left over.

This next step is just as critical as the length of the tail. Make 2 or 3 wraps of the noodle right behind the eyes in the same place. Then bring the remaining loop forward underneath and tie off at the hook eye. Comb all fibres out of the way while making the head and whip finish. Once the fly is finished get the brush and brush out any trapped fibres and then brush the hair towards the tail. The fly is now ready for head cement.

The reason for the extra wraps of the noodle right behind the eyes is to create a bigger diameter at the front or head of the body. The water is pushed over the head portion of the fly creating a turbulent flow over the fly which in turn creates a flow over the marabou tail giving this fly amazing action in the water.
The last item to discuss is the dubbing itself. Most tiers will only use what is available from suppliers which I find to short therefore I am cutting hair off rabbit skins until my fingers are raw. It is the only way I know of to get the length of hair required. I have used other materials, angora and llama are two, but in tying this fly nothing compares to long rabbit. There are some colors I use that come right off the hide, black, white, red, yellow, and blue. These are primary colors and no other colors in the world can be used to blend these. I will also use fluorescent colors right off the skins but the rest of the colors I use are blended. My brown dubbing, for instance, has no actual brown hair in the dubbing. It is a mixture of colors that when combined make brown. I can mix virtually any shade of brown from a light tan to the darkest brown just by blending the colors in different quantities. I can lighten, darken, and even make a pastel type of color to exactly imitate any type of food organism.
The reason I do this came to me back in 1974 when I really started to notice the different colors that make up individual aquatic insects. As an example a Hex nymph is not one solid color, it has grey, tan, and brown. In fact every living thing in and out of water is a mixture of colors from Humans to the tiniest of insects. So, the best way to come close to duplicating nature with your dubbing is to blend multiple colors to give an appearance of a solid.
Another aspect contributing to why I started to blend color is what I read in the book “Through the Fish’s Eye”; this book made me understand the difference in colors at certain depths of water. We as humans see through a medium of air and see colors differently than fish do that use the medium of water to see through. Have you ever noticed how colors change once you view them underwater? In clear water at the 10 foot level a bright yellow will turn to a pale yellowish white color, red will turn to a dark brown, now as humans we get to look down into the water on these colors and to our eyes they remain yellow and red. Interesting isn’t it. So in water every color changes color except for black, which is the absence of light, and white, which has all the light.
How many variations can this fly be tied in? Well, that just depends on your imagination? I tie these flies in one solid color (blended to give the impression of a solid, of course) as well as what I call DDH Heads which are two tone flies or what people call egg sucking leeches. For the DDH Head patterns I usually use contrasting colors such as chartreuse and black, yellow and red, white and pink, etc.
I also do tri color flies that I call DDH Minnows which consist of a body color, gills, and the head. A great combination is a tan tail and body, red gills, and an olive bronze head. You can also do what I call candy cane DDH Leeches which are alternating colors of dubbing in the loop. No matter what color or how you tie it, this fly is limitless in possibilities and boy does it catch fish.
Have fun!
#

THOSE DDH LEACHES ARE AMAZING I CAUGHT TWO FISH WITH ONE CAST
WHEN USED PRODUCES ALOT OF FISH OUTSTANDING FLY!
Really happy that this fly works for you. Must have been a blast with 2 fish on, were you fishing a tandem rig?
Stu
Well, I just tried tying this with some olive colour rabbit dubbing I had left over… Stuff is way to short, I ended up with a wooly bugger with peepers…
Thank you for sharing your DDH Leech pattern. I started tying it last season and have caught large and smallmouth bass, channel catfish, perch, bluegills using it here in South East Michigan.
Really glad you caught so many different species on it. I had a chance to fish the Au Sable with it and although I didn’t land any I had 3 browns hit the fly. Two smaller and one that would have been in the 20 inch range. Had him on for 3 headshakes but lost the fish. Would love to see some pics.
Stu
Where do you fish for brown and rainbow trout
Where in Manitoba
On the east side of the province you have Hunt, Lyons, McHugh, and Camp lakes to fish. On the west side there are numerous lake in the Parklands area and Duck Mountains. If you check the fishing regulations it will give you a list of stocked trout waters. Or you can go to the FLIPPR web site and they have directions for s few lakes.
What is the best DDH leech for brown and rainbow trout
There are 3 colors that really produce well. Olive, Black, and Brown are my go to colors for trout. Brown by far is the best for all species.
Howdy! I simply would like to give a huge thumbs up for the great content you have here on this post. I will probably be coming again to your blog for more soon.
Most lure designs work as long as they move a certain way, have a profile fish notice and track and stay in the strike zone long enough.